Pages

Wednesday, February 22, 2012

lotion bar recipe...


Lotion bars...so luxurious.


The recipe, so simple.


All you need is equal parts of:

Beeswax

Shea Butter

Coconut Oil

and add to that your choice of essential oils

(If I use 60 g of each ingredient, I add about 1tsp of essential oils.)


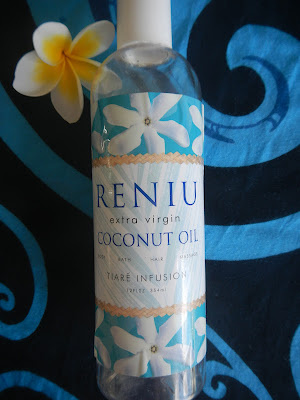
I used this 'Tiare' infused coconut oil.  I love the smell of this flower so much that I named one of my daughters Tiare!


You could also use Sweet Almond Oil or another oil instead of coconut  if you want to...remember this is YOUR lotion bar !


The method, is also simple:


Melt the beeswax

(I use a pyrex jug and put it straight into a pot of hot water)

Then add the shea butter and coconut oil.

(Shea butter doesn't  like to be heated for too long, it might get grainy when it cools.)


Take off the heat and let it cool for a couple of minutes.


If using essential oils, add them now, and stir well.


Then pour it all into your molds.


I use cupcake molds and if I use about 60g of each ingredient, I get 2 nice sized lotion bars.


They will set in no time at all, but if you want to speed up the process, just put them in the fridge.


Bear in mind, that your recipe may need to change with the seasons...when it's cooler you might need to add more coconut oil to make a softer bar.


Play with it and see what works for you, you can always re-melt it if it's not quite right.


In our tropical climate this recipe is perfect for summer, it glides on beautifully.


Storing your lotion bars


I had been storing my lotion bars in paper cupcake cases - it worked for me!
Then I read somewhere (can't remember where) that a lady stores her lotion bars in giant tea bags - what is a giant tea bag??

  Anyway, that got me thinking...  I have a roll of biodegradeble nappy liners in the cupboard that I never really used.  They are made of a papery, tea-baggy kind of material and it's quite strong...


so I pulled out the sewing maching and sewed a couple of little bags, just big enough for 1 lotion bar. 


...look at that, a perfect fit.


But don't just take my word for it...there are lots of other lotion bar recipes out there, have a look here, here and here for more ideas.


Tuesday, February 21, 2012

Tutorial: Flower Girl Bendy Dolls


A couple of weeks ago, I bought a bag full of embroidery thread from the op shop.  In the bag, there were 3 artificial flowers with no stems.  So I decided to have a go at making some flower girl dolls.  And I'm really pleased with how they turned out, so sweet, Miss Autumn and Miss Spring.  The other flower is a green one, maybe Miss Summer?


To make a doll, you'll need a flower, with the stem removed, a bendy doll - small size, about 10cm high, a piece of wool felt, some wool roving for the hair, and some thread.


First job is to give her some stockings, not totally necessary, but guarantee, someone will look under her skirt,   and it's nice for her to have pretty legs!!  So bend one leg out of the way, and put a little bit of glue on one leg, smear it around to cover all sides.


Start with the end of the thread around mid leg, then take it to the bottom and start winding UP the leg, covering the end of that thread.  When you get to the top, just glue the end down.


Repeat with the other leg.


Now take your flower and remove the middle piece.  The back and front should easily pull apart.


Note that you have a few layers of small petals and a few layers of larger petals.  Remove the small petals and put them aside for now.  They will become her hat.


Cut across the middle of the flower, just big enough to fit around the dolls waist, about an inch.


Now put the her feet through the hole you just cut, one at a time.  It will be a tight fit, but it WILL fit! Then pull it up over her waist.  You can glue it if you like, but if it is a tight fit, it won't be going anywhere.


Now for her top.  I cut this very basic pattern.  The side bits are the sleeves, so adjust them according to the length you want.  For a summer doll I would probably go sleeveless.


Cut a slit down through the centre just big enough to fit over her head, about an inch long.  And embellish her top to your liking.


Now place the top over her head and sew the bottoms of the sleeves together.  You can also sew the sides of the top together, I chose not to.


For her hair...Glue your piece of wool roving onto her head.


Now take those smaller petals that you set aside earlier... sew a small piece of felt over the middle to hide the hole....and sew the little flower with a couple of stitches to her hair for a hat.


And there you have it, a pretty little flower girl !


Big kisses for this flower girl from Marlise!!

Monday, February 20, 2012

moments at home with my little girl...

Sometimes I just have to stop and cherish those little moments I have at home with Marlise...


Helping me put the 'tatoes' into the pot.


OK, 2 days ago when I found her up on the bathroom sink eating toothpast, I was just a little bit angry...


Today, I just smiled, and took pictures.


Toothpaste art, little girls love it !


Marlise loves her daily 'block' (ice block), so we made some more.  She loves trying to squeeze the oranges...


and putting the lids on...


caught you!...and adding extra nutrients to the orange juice !


You'll never believe how long this kept her amused...a few safety pins, a tiny tea cup, a little plastic lid and a clock face...at least 15 mins of fun.  Awesome.


And then she drew me some flowers - that's what she said 'flower!'
And then she went to bed.

Wednesday, February 15, 2012

Valentine....

Hope you all had a wonderful Valentines Day....


and a really good night's sleep !

Monday, February 13, 2012

This is how I make yoghurt...

Do you make your own yoghurt?  Have you ever tried? 

Yoghurt is a wonderful, healthy food and is so easy to make at home.  It's also much cheaper to make your own, and you can add whatever fruit you have to flavour it.

this is what I do.....
Measure out 1L of pasteurized milk. 


Then measure 1 Tablespoon of natural yoghurt for your starter.  Make sure it is a natural yoghurt and that it contains LIVE cultures.  I use Jalna yoghurt, either the biodynamic organic yoghurt, or sometimes I get the Jalna Greek Style natural Yoghurt - just because I can buy it in a smaller tub.  The ingredients list includes lactobacillus acidophilus, bifidobacterium, lactobacillus casei - these are your LIVE cultures.  It's important to use a yoghurt starter with LIVE cultures because they will innoculate your milk and help to turn it into yoghurt.


I use a 1 litre thermos to incubate my yoghurt, make sure it's had a good clean!


Once I have everything ready, I heat up the milk.  I don't use a thermometer, I just bring the milk almost to the boil, you can tell it's there when it's steaming and starts to froth a little around the edges.
I take it off the heat, and  pour it into my pyrex jug to cool down to the point where I can comfortably put  my clean  finger in and leave it there...luke warm isn't warm enough, it has to be quite warm!


When the milk is ready, I put the spoonful of yoghurt into the thermos, then  pour in a little milk and give it a good stir.  Pour in the rest of the milk, give it another good stir  and close the lid.


The yoghurt 'doesn't like to be disturbed, so I put the thermos in a corner of the kitchen and leave it at least 8 hours but no more than 24hours.


The result, yummy fresh yoghurt.  Bear in mind that homemade yoghurt isn't as thick as the stuff you buy.  My yoghurt is generally quite pourable, and sometimes thin enough to be drinkable - but  I like it like that !

You can thicken your yoghurt naturally by straining it through a muslin bag.  This removes the whey from the yoghurt, leaving a nice thick consistancy.  You can strain it anywhere from a few hours to a few days - up to you how thick you want it to be (keep in the fridge while it's straining).  Once all the whey has drained out, you'll have whats called  'yoghurt cheese'.  Yoghurt cheese is great as a spread or a dip.  Just add some herbs and any other flavour you like, or, for a really decadent treat, try these yoghurt maple balls, they are so good!

Homemade yoghurt can also be quite tart tasting.  If you're after a sweeter version, adding pureed fruit is delicious.  Or try a bit of maple syrup and cinnamon mixed into the yoghurt
too  ...mmmmmm...   I'm feeling like some right now !!

Thursday, February 9, 2012

can you tell a story ?

A while ago, I took Ruby to a playgroup.  After some free play, the leader had all the kids sit down on the floor for story time.  That's when I got nervous.  Ruby didn't have the longest attention span, and I expected her to jump up and start wondering on to something else within a couple of minutes.  But then the story began...there was no book!  Just a few tiny stuffed animals and a hat, and the most amazing story teller that ever was...i was completely immersed in the story, and so were all the kids.  It was so fantastic!  This lady knew the story by heart, and told it with such animation using her little props - it was like the story was alive!

I wish I could remember that story...  


I went home and tried to tell Ruby about the animals who found a home in a hat, but with all the other amazing songs and ryhmes we heard that morning, I could only remember fragments of some of them which really didn't amount to much at all...so sad ! 

I'm not much of a story teller.  I think some people just have the gift, and then there's the rest of us!  But that doesn't stop me from telling stories to my kids.


Ruby loves a good book, and she's got a stack of good books,  but she loves it more when I just tell her a story.  The whole  'telling a story without a book' concept was a bit new to me at the time, so I was a slow to get started...but I'm getting better!


One of the first stories I started telling her was "The Hare and the Tortoise".  Why?  Well, because I had just seen THIS tutorial on making a felt turtle.  I love my turtle / tortoise because it was the fist felt toy I made, and I was pretty impressed with my efforts!!  So I found a story to use him in, which meant I needed a rabbit / hare.  So I made one of them too.  Then I had to re- learn the story, I was a bit rusty...and then it began.  Ruby loved it so much, we had to do that story every day, a thousand times a day, and she never tired of it...aaaaaaaaahhhhhhhhhhhhhhhhh!!!!!!!!!!  Time for a new story....

See the little Gingerbread man sitting on the foxes back !

Another story we do is the one about the "The Gingerbread Man" and the reason I started telling her that one was because I had made a felt gingerbread man ornament for the Christmas tree that year.  So there was my first prop!   And although the story calls for a pig, a cow, a horse and a fox, I figured it would be OK to change it, and use the props we already had...so by now I had made a pig anyway, and the fox was made especially for this story.  The hare and the tortoise also featured, coz there was no cow, or horse in our story stash.  but that's OK!  Kids don't mind who is acting out the story - they love the fact that you are telling them a story.

Her all time favourite stories are the ones that start with "Once upon a time there was a girl called Ruby..." Then I proceed to tell her about all the things that Ruby did that day - usually the stuff she really did do.  And it always ends with "...and the sun went down and the moon came up, and Ruby fell fast asleep."  No props, just a dose of reality in story form, and she LOVES it.


Here's a great story about Mr Wiggle and Mr Waggle, a perfect 'simple' story.  Ruby and I have been practicing this one together for the last few days.  She wants to 'take' her story and do it infront of her class for show and tell sometime !

Ruby telling her version of Mr Wiggle and Mr Waggle

Our story repetoire isn't that big - I'm not good at making up stories, and even telling them sometimes is a big effort, but we've gathered a few more props to help. Sometimes I'll ask Ruby to pick 3 characters and together we make up a story - the simplest ones are always a hit - kids are good at 'simple'...I need to practise that a bit more!


Wednesday, February 8, 2012

What's brewing in your kitchen...?

Some friends of ours used to come over for dinner quite a lot, and one of them always used to ask me "What's brewing in your kitchen this week?", because I always seem to have jars or bowls of stuff  'on the go - fermenting or soaking' in my kitchen, and he was fascinated - I'm glad someone was interested !!

So this is what's 'growing' in my kitchen today...


Front left, dark brown crock is half full of sauerkraut that I prepared today.  I'll let it ferment for about 3-5 days, and bottle it when it gets to the taste that I like.

Jar with the black lid contains orange peels and vinegar. I'm making another batch of orange citrus cleaner.  Smells amazing. Still has another week left to steep.

Glass jar in the middle is my milk kefir - it's a constant on my bench top, I make 2 cups every day.

Forgot to add my water kefir to the photo - it lives in a jar in the cupboard and is also a constant in my home.

White crock behind the citrus cleaner is my sourdough starter, day 2 today, and is looking good!

Brown and white crock is full of fermenting ginger beer, smells divine!  Will be ready for bottling on Friday, then I have to leave it another 2 weeks I think...this is my first batch and I'm excited !!

Blue bowl is filled with pecan nuts, soaking in slightly salty water.  Actually, as I write this, they are in a very low oven to dry out.  By the morning they will be lovely and crispy and much healthier than eating unsoaked nuts.  This is the 2nd time I've soaked pecans - they are so much yummier this way!

What's growing in your kitchen today ???

Thursday, February 2, 2012

slow living in 2012...

Anyone who knows me well enough, knows that I love to cook from scratch.  I love to try strange things( like fermenting foods) that will provide my family with good health.  I love to make my own skin care products.  I love to use natural things to clean my home, and myself.  I love to make handmade toys for my children.  I love to pick fresh herbs from my garden. I love to tick one more thing off the list that I don't have to buy at a supermarket.  I love that I can choose to make my home as chemical free as I can.  I love to be somewhat self sufficient,  and I love the challenge of being able to make things rather than buy them.  All of these things help me to enjoy my version of living simply, and if you haven't already guessed, I love it like that !

Christine, over at a blog called Slow Living Essentials has come up with a brilliant idea.  She has created an outline for a monthly blog diary based around 9 slow living categories.   I've decided to join in with her, and hopefully many others, and will post a monthly diary based on my goals and achievments for each one.
Here's a list of the 9 categories below, but for a full explanation, head over to her blog

SLOW LIVING - Month by Month 2012NOURISH: Make and bake as much as possible from scratch. Ditch overpackaged, overprocessed convenience foods and opt for 'real' food instead. Share favourite links/recipes/tips from the month here.

PREPARE: Stockpile and preserve. Freeze extra meals or excess garden/market produce. Bottle/can, dehydrate or pickle foods to enjoy when they are not in season. Aim to reduce dependancy on store bought items especially those known to contain BPA and other suspect additives. Stocking up on dry goods when prices are low counts too.

REDUCE: Cut down on household waste by re-using, re-purposing and repairing. A ladder into a strawberry planter? A sheet into a dress? Share ideas and project links here, allowing others to be inspired.

GREEN: up our lives. Start (or continue!) using homemade cleaners, body products and basic herbal remedies. The options are endless, the savings huge and the health benefits enormous.

GROW: plant/harvest. What's growing this month? What's being eaten from the garden? Herbs in a pot, sprouts on a windowsill or and entire fruit/vegetable garden -opt for what fits space and time constraints. Don't have a backyard? Ask a friendly neighbour or relative for a small patch of theirs in return for some home grown produce, they may surprise you!

CREATE: to fill a need or feed the soul. Create for ourselves or for others. Create something as simple as a handmade gift tag or something as extravagant as a fine knit shawl. Share project details and any new skills learnt here.

DISCOVER: Feed the mind by reading texts relevant to current interests. Trawl libraries, second hand shops or local book shops to find titles that fill the need. Share titles/authors of what is being read this month.

ENHANCE: community: Possibilities include supporting local growers & producers, help out at a local school/kindergarten, barter or foodswap, joining a playgroup or forming a walking or craft group. Car pooling where possible and biking/walking instead of driving. Even start up a blog if you haven't already - online communities count too! Or maybe just help out someone trying to cross the street! The rewards for your time are often returned tenfold.

ENJOY: Life! Embrace moments with friends and family. Marking the seasons, celebrations and new arrivals are all cause for enjoyment. Share a moment to be remembered from the month here.

Carole's slow living - Month 1 (January)

NOURISH: We've had a great start to the year with our decision to prepare and eat more 'real' food.  My favourite salad was this blackbean, sweet corn and capsicum salad, made using dried black beans from the storage cupboard.  Made kefir cheese and loved it, need to get creative and use more of it.  Continuing to make milk and water kefir, so glad the kids love it.  Need to make time to freeze some home baking for school lunches.  Make sure there are always enough left overs from dinner for my husbands lunch the next day.  Must make a sour dough starter.

PREPARE:  Mango chutney, frozen mango slices, fish stock, chicken stock and beef stock for the freezer.  Went through our emergency pack, time to rotate some of the food , and need to add digital copies of important documents.

REDUCE:  Cut up an old towel to use as baby wipe cloths.  Cut the legs of my husbands old work pants and made them into work shorts. 

GREEN:  Have a nice fresh batch of olive oil body lotion, coconut oil face moisturizer
                 and  deodorant in the bathroom.  Would like to find a good toothpaste recipe that we will use.

GROW:  thyme, basil, chives, parsley, sage, stevia, ginger, turmeric.

CREATE:  the kids love their new felt toys - a horse and an elephant.

DISCOVER:  From the library, "Bills Everyday Asian" by Bill Granger - BEST Asian cookbook ever! 

ENHANCE: COMMUNITYWalking with my daughter to school and home again every day, and  keeping my blog active.

ENJOY: LIFE: Australia Day - first time Ruby  watched fireworks and wasn't scared...and the first time Marlise has seen fireworks, EVER!  and they both loved it.